> ## Documentation Index
> Fetch the complete documentation index at: https://inference-docs.cerebras.ai/llms.txt
> Use this file to discover all available pages before exploring further.
# Interviewer Voice Agent with LiveKit
> Learn how to integrate LiveKit's voice capabilities with Cerebras's fast inference to build a real-time voice interview agent that analyzes your resume and job descriptions to conduct personalized mock interviews.
export const CookbookLayout = () => {
return ;
};
export const AuthorBlock = ({name, title, date, githubUrl}) => {
return
;
};
We all know preparing for an interview is hard, especially when there's no one around to test your skills. Lots of websites offer mock interviews, but they also cost a lot! So what can you do when you're a student fresh out of college and want to land the job of your dreams?
I have good news for you! You can code your own interview practice agent, and make it feel as human-like as possible by using LiveKit voice agents with blazing fast LLMs hosted on Cerebras API cloud. By the end of this tutorial, you'll have a nice, free, and fast personal interview agent to crush all your future interviews...AND you can customize it to the specific job you're preparing for.
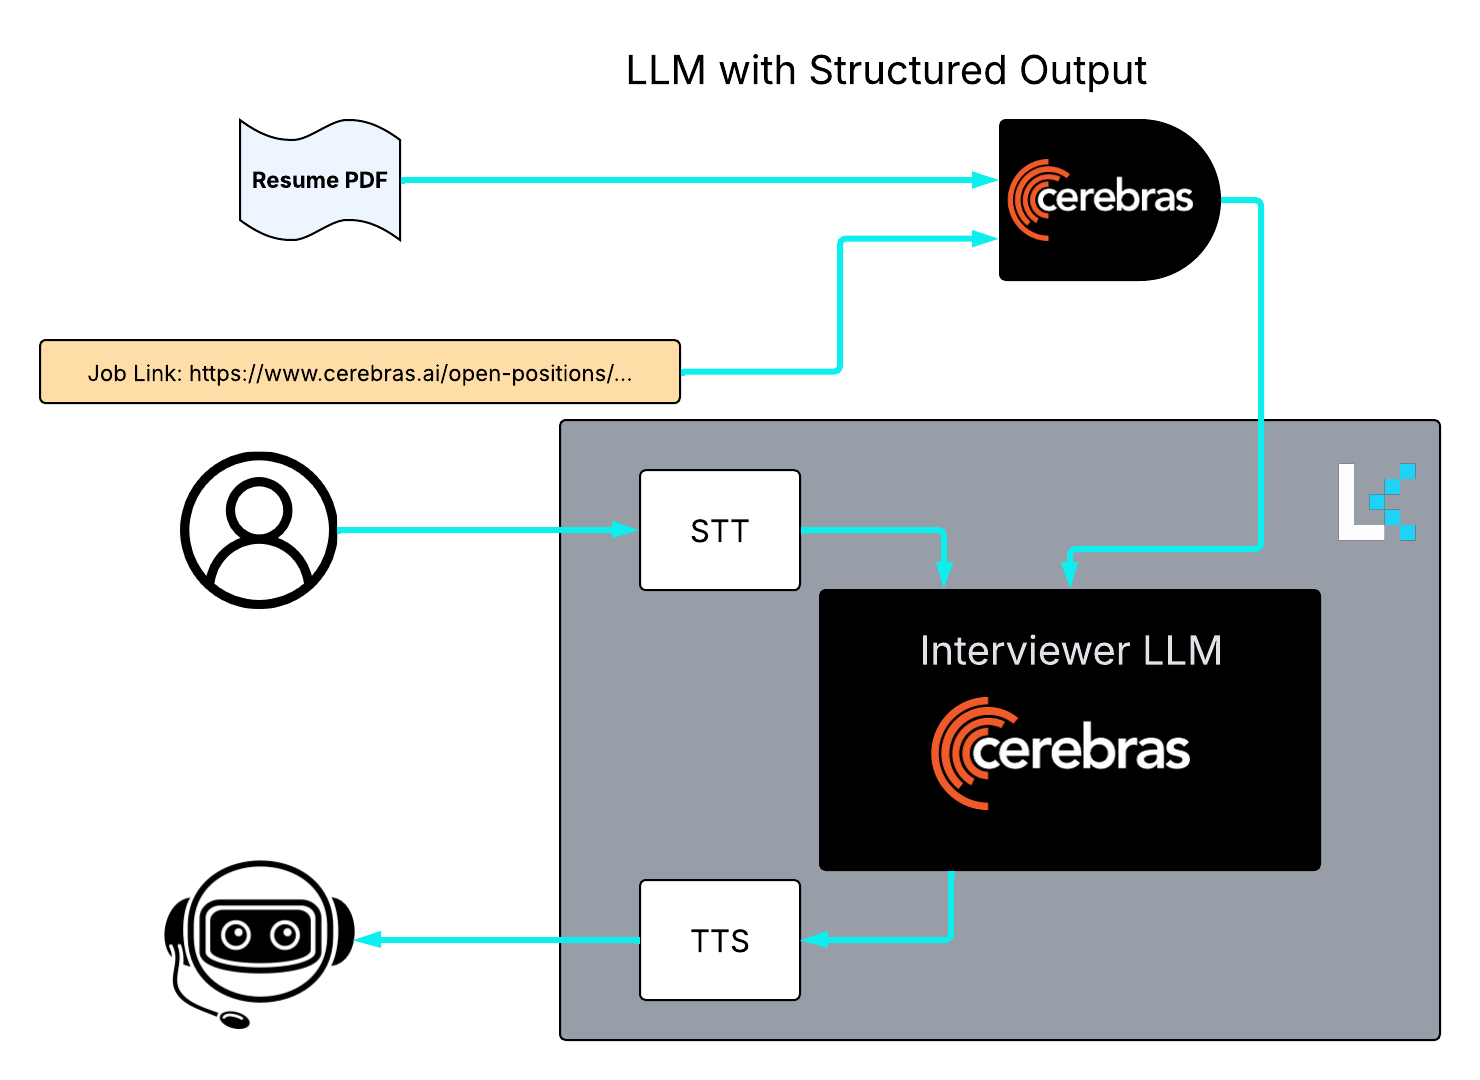
The diagram below shows the general workflow we'll build:
Basically, our agent will have four major components:
* LLM with structured output to understand the resume and job link
* Speech to Text (STT) to convert user speech to digestible text for the interviewer
* Interviewer LLM to conduct the interview based on the user responses and the conversation context so far
* Text to Speech (TTS) to convert the interviewer LLM responses to human-like speech
LiveKit helps us put all these together! We'll explain everything in a bit so buckle up and let's get started!
First, we start by making sure all the packages we need are installed:
```python theme={null}
!pip install LiveKit-agents[openai,silero,deepgram,cartesia,turn-detector]~=1.0
!pip install cerebras-cloud-sdk beautifulsoup4 PyPDF2 pdfplumber
```
Let's import every package we will need. We will explain how each of these packages are used later.
```python theme={null}
from LiveKit.agents import (
Agent,
AgentSession,
JobContext,
RunContext,
WorkerOptions,
cli,
function_tool,
ChatContext,
jupyter
)
# from dotenv import load_dotenv <---- only if you decided to add your environment variables in a separate .env file.
# load_dotenv()
from cerebras.cloud.sdk import Cerebras
import requests, os, json, re, sys
from bs4 import BeautifulSoup
import pdfplumber
from LiveKit.plugins import deepgram, openai, silero
from cerebras.cloud.sdk import Cerebras
from datetime import datetime
```
To make our API calls to Cerebras and LiveKit, we need to add the following API Keys (replace the `XXXXXX`). To get a Cerebras API Key see our [QuickStart guide](https://inference-docs.cerebras.ai/quickstart?utm_source=3pi_livekit-interviewer\&utm_campaign=docs) and to get LiveKit API key and secret see the [Voice AI quickstart](https://docs.LiveKit.io/agents/start/voice-ai/#requirements) .
```python theme={null}
os.environ["LiveKit_API_KEY"] = ""
os.environ["LiveKit_API_SECRET"] = ""
os.environ["LiveKit_URL"] = "wss://voice-assistant-.LiveKit.cloud"
os.environ["CEREBRAS_API_KEY"] = ""
os.environ["DEEPGRAM_API_KEY"] = ""
```
## Parsing the Job description link
Let's start by extracting useful details from the job link. This information will be added to the context of our interviewer agent. Follow the instructions below.
We will need two major components:
1. A tool to read a given link and extract the text from it. We will use `BeautifulSoup` for this.
2. An API call to a [Cerebras supported LLM](https://inference-docs.cerebras.ai/models/overview) to process the input text. We want this LLM to support [structured output](https://inference-docs.cerebras.ai/capabilities/structured-outputs).
We will implement all these in a function called `process_link`:
Our function looks like this (we will break it down and explain what each segment does):
```python theme={null}
def process_link(link):
try:
response = requests.get(link)
soup = BeautifulSoup(response.text, 'html.parser')
text = soup.get_text()
# Preprocess the text
lines = (line.strip() for line in text.splitlines())
chunks = (phrase.strip() for line in lines for phrase in line.split(' '))
text = '\n'.join(chunk for chunk in chunks if chunk)
except Exception as e:
print(f"An error occurred: {str(e)}")
client = Cerebras(
api_key=os.environ.get("CEREBRAS_API_KEY") )
job_schema = {
"type": "object",
"properties": {
"job title": {"type": "string"},
"job type": {"type":"string", "enum":["full-time","part-time","contract","internship"]},
"location": {"type": "string"},
"start date": {"type": "string"},
"qualifications": {"type": "string"},
"responsibilities": {"type": "string"},
"benefits": {"type": "string"}
},
"required": ["job title","job type", "qualifications", "responsibilities"],
"additionalProperties": False
}
completion = client.chat.completions.create(
model="llama-3.1-8b",
messages=[
{"role": "system", "content": f"You are a link summarizing aganet. All information you need about the job is here: {text}"},
{"role": "user", "content": f"Following the given response format, summarize the relevant information about this job."}
],
response_format={
"type": "json_schema",
"json_schema": {
"name": "job_schema",
"strict": True,
"schema": job_schema
}
}
)
# Parse the JSON response
job_data = json.loads(completion.choices[0].message.content)
print(json.dumps(job_data, indent=2))
return job_data
```
Now let's break this down:
```bash theme={null}
try:
response = requests.get(link)
soup = BeautifulSoup(response.text, 'html.parser')
text = soup.get_text()
# Preprocess the text
lines = (line.strip() for line in text.splitlines())
chunks = (phrase.strip() for line in lines for phrase in line.split(' '))
text = '\n'.join(chunk for chunk in chunks if chunk)
except Exception as e:
print(f"An error occurred: {str(e)}")
```
We first get the html link and remove leading and trailing whitespace characters (spaces, tabs, newlines, etc.) from each line. Then, we split each line into phrases wherever there are two or more spaces (`' '`). All this is wrapped inside `try:... except:...` to catch any exceptions. The resulting text will be used as context for our LLM.
To make the API call to the LLM, we need:
```bash theme={null}
client = Cerebras(api_key=os.environ.get("CEREBRAS_API_KEY") )
```
The next step will be to define the structure of our output. The job title, location, start date, qualifications, responsibilities, and benefits are strings that could take any value whereas the job type needs to take one of the options `["full-time","part-time","contract","internship"]`.
```bash theme={null}
job_schema = {
"type": "object",
"properties": {
"job title": {"type": "string"},
"job type": {"type":"string", "enum":["full-time","part-time","contract","internship"]},
"location": {"type": "string"},
"start date": {"type": "string"},
"qualifications": {"type": "string"},
"responsibilities": {"type": "string"},
"benefits": {"type": "string"}
},
"required": ["job title","job type", "qualifications", "responsibilities"],
"additionalProperties": False
}
```
Now we are ready to make the call and use chat completion with an appropriate system prompt. Remember to add the extracted text in the first step to the system prompt.
```bash theme={null}
completion = client.chat.completions.create(
model="llama-3.1-8b",
messages=[
{"role": "system", "content": f"You are a link summarizing aganet. All information you need about the job is here: {text}"},
{"role": "user", "content": f"Following the given response format, summarize the relevant information about this job."}
],
response_format={
"type": "json_schema",
"json_schema": {
"name": "job_schema",
"strict": True,
"schema": job_schema
}
}
)
```
You can replace the model name with any other model supported by Cerebras (See [supported models](https://inference-docs.cerebras.ai/models/overview)). You might need to change the system and user prompts for the call.
Finally, we parse the JSON response and return it as the output to `process_link` function.
```bash theme={null}
job_data = json.loads(completion.choices[0].message.content)
print(json.dumps(job_data, indent=2)) #to print out the result
return job_data
```
## Parsing the resume PDF
Now, we do something similar to parse the pdf of the resume file.
```python theme={null}
import pdfplumber
import re, json, os
from cerebras.cloud.sdk import Cerebras
def parse_pdf_to_text(file_path, context_file_path=None):
"""
Parse a PDF file into plain text, removing bulletpoints and special signs, but preserving characters like @ and .
Args:
file_path (str): Path to the PDF file.
context_file_path (str, optional): Path to the JSON context file. Defaults to None.
Returns:
str: The parsed text.
"""
try:
with pdfplumber.open(file_path) as pdf:
text = ''
for page in pdf.pages:
text += page.extract_text()
# Remove bulletpoints and special signs, but preserve characters like @ and .
text = re.sub(r'[\n\t\r]', ' ', text)
text = re.sub(r'[^\w\s\.,!?@:\-]', '', text)
text = re.sub(r'\s+', ' ', text)
text = text.strip()
if context_file_path:
with open(context_file_path, 'r') as f:
context_data = json.load(f)
# You can now use the context data as needed
print("Context Data:")
print(json.dumps(context_data, indent=4))
return text
except Exception as e:
print(f"Error parsing PDF: {e}")
return None
def process_pdf(pdf_path):
try:
text = parse_pdf_to_text(pdf_path)
except Exception as e:
print(f"An error occurred: {str(e)}")
client = Cerebras(
api_key=os.environ.get("CEREBRAS_API_KEY") )
resume_schema = {
"type": "object",
"properties": {
"education": {"type": "string"},
"skills": {"type":"string"},
"languages": {"type":"string"},
"job experience": {"type":"string"},
"publications": {"type":"string"},
"location": {"type": "string"},
"phone number": {"type": "integer"},
"linkedin": {"type": "string"},
"github": {"type": "string"},
"google scholar": {"type": "string"}
},
"required": ["education","skills","job experience"],
"additionalProperties": False
}
completion = client.chat.completions.create(
model="llama-3.1-8b",
messages=[
{"role": "system", "content": f"You are a resume summarizing aganet. All information you need about the candidate is here: {text}"},
{"role": "user", "content": f"Following the given response format, summarize the relevant information about this candidate."}
],
response_format={
"type": "json_schema",
"json_schema": {
"name": "resume_schema",
"strict": True,
"schema": resume_schema
}
}
)
# Parse the JSON response
candidate_data = json.loads(completion.choices[0].message.content)
print(json.dumps(candidate_data, indent=2))
return candidate_data
```
We will define two functions:
1. `parse_pdf_to_text` which converts our pdf file to plain text that will be used as the context to our LLM.
2. `process_pdf(` which after calling `parse_pdf_to_text`, makes a Cerebras API call to generate a structured output summarizing the resume content. This function is very similar to `process_link`.
Let's take a look at `parse_pdf_to_text`:
```bash theme={null}
with pdfplumber.open(file_path) as pdf:
text = ''
for page in pdf.pages:
text += page.extract_text()
```
These lines use the [package](https://github.com/jsvine/pdfplumber) `pdfplumber` to extract information from a pdf file. Then, we remove the unnecessary characters using [Regex](https://docs.python.org/3/library/re.html).
```bash theme={null}
text = re.sub(r'[\n\t\r]', ' ', text) # Replace newline, tab, and return characters with space
text = re.sub(r'[^\w\s\.,!?@:\-]', '', text) # Remove non-alphanumeric characters, non-spaces, and non-preserved special characters
text = re.sub(r'\s+', ' ', text) # Replace multiple spaces with single space
text = text.strip() # Remove leading and trailing spaces
```
As an optional step, and provided we have a context file path, we can save the results there for later use:
```bash theme={null}
if context_file_path:
with open(context_file_path, 'r') as f:
context_data = json.load(f)
# You can now use the context data as needed
print("Context Data:")
print(json.dumps(context_data, indent=4))
```
The function returns the extracted and cleanedup `text`. Again, all this is wrapped inside `try:... except:...` to catch any exceptions.
## Interviewer Agent
Even though in this section we are designing a voice agent specifically for an interview practice, the general pipeline can be repurposed to any other voice agent you want to build!
Let's build our interviewer agent:
```python theme={null}
class Assistant(Agent):
def __init__(self, chat_ctx: ChatContext) -> None:
super().__init__(chat_ctx=chat_ctx, instructions="You are a voice assistant that helps the user practice for an interview.")
async def entrypoint(ctx: JobContext, candidate_context, job_context):
try:
await ctx.connect()
session = AgentSession(
vad=silero.VAD.load(),
stt=deepgram.STT(model="nova-3"),
llm=openai.LLM.with_cerebras(
model="gpt-oss-120b",
temperature=0.7,
extra_headers={"X-Cerebras-3rd-Party-Integration": "livekit-interviewer"}
),
tts=deepgram.TTS(model="aura-2-thalia-en"),
)
today = datetime.now().strftime("%B %d, %Y")
chat_ctx = ChatContext()
chat_ctx.add_message(role="user", content=f"I am interviewing for this job: {job_context}.")
chat_ctx.add_message(role="user", content=f"This is my resume: {candidate_context}.")
chat_ctx.add_message(role="assistant", content=f"Today's date is {today}. Don't repeat this to the user. This is only for your reference.")
await session.start(
agent=Assistant(chat_ctx=chat_ctx),
room=ctx.room)
# Initial prompt from assistant
assistant_msg = await session.generate_reply(
instructions="In one sentence tell the user that you will conduct a mock interview to help them prepare. No filler or explanation. Then pause."
)
chat_ctx.add_message(role="assistant", content=assistant_msg)
# Main interaction loop: listen/respond with context
while True:
user_input = await session.listen() # STT
if user_input:
chat_ctx.add_message(role="user", content=user_input)
# Step 3: Provide short feedback only
feedback_msg = await session.generate_reply(
instructions="Give a short, informal sentence of feedback, without repeating the user's response. Speak naturally, like a coach. Then, pause."
)
chat_ctx.add_message(role="assistant", content=feedback_msg)
await session.speak(feedback_msg)
except Exception as e:
print(f"An error occurred: {str(e)}")
```
Let's break this code down! Good news! LiveKit takes care of many of the major components of this segment through `AgentSession`. All we need to do is choose what we want to use for Speech To Text (STT), Text To Speech (TTS), and Voice Activity Detector (VAD).
### JobContext
When defining our async `entrypoint` function, an important input is the `JobContext` (here we call it `ctx`). All you need to do, is to connect to the "room" where the conversation is happening by using:
```bash theme={null}
await ctx.connect()
```
### Assistant
Let's define our Agent subclass called `Assistant` which receives the chat context (subclass of `ChatContext`) and an instruction (system prompt).
```bash theme={null}
class Assistant(Agent):
def __init__(self, chat_ctx: ChatContext) -> None:
super().__init__(chat_ctx=chat_ctx, instructions="You are a voice assistant that helps the user practice for an interview.")
```
### AgentSession
The agent session is responsible for collecting user input, managing the voice pipeline, invoking the LLM, and sending the output back to the user (see [LiveKit Docs](https://docs.LiveKit.io/agents/build/)).
```bash theme={null}
session = AgentSession(
vad=silero.VAD.load(),
stt=deepgram.STT(model="nova-3"),
llm=openai.LLM.with_cerebras(
model="gpt-oss-120b",
temperature=0.7,
extra_headers={"X-Cerebras-3rd-Party-Integration": "livekit-interviewer"}
),
tts=deepgram.TTS(model="aura-2-thalia-en"),
)
```
Here, for both [STT integration](https://docs.LiveKit.io/agents/integrations/stt/) and [TTS integration](https://docs.LiveKit.io/agents/integrations/tts/) we use [Deepgram](https://developers.deepgram.com/home). For VAD we use [Silero](https://github.com/snakers4/silero-vad).
In order to ingerate Cerebras with this pipeline, we use the LiveKit plug-in:
```bash theme={null}
llm=openai.LLM.with_cerebras(
model="gpt-oss-120b",
temperature=0.7,
extra_headers={"X-Cerebras-3rd-Party-Integration": "livekit-interviewer"}
),
```
where we can choose the model name, temperature, etc. See [this page](https://docs.LiveKit.io/agents/integrations/llm/cerebras/).
You may have noticed that our agent receives a `ChatContext` as input. This is to make sure that we preserve the prior conversations. Before connecting the agent, we might want to give it some prior context. We do that as follows:
```bash theme={null}
today = datetime.now().strftime("%B %d, %Y")
chat_ctx = ChatContext()
chat_ctx.add_message(role="user", content=f"I am interviewing for this job: {job_context}.")
chat_ctx.add_message(role="user", content=f"This is my resume: {candidate_context}.")
chat_ctx.add_message(role="assistant", content=f"Today's date is {today}. Don't repeat this to the user. This is only for your reference.")
```
Where apart from the `job_context` (extracted from job link) and `candidate_context` (extracted from candidate resume),we add the current date as well for the agent's reference.
### Starting the session and generating the first agent message
Now that we have all our ingredients, we can start our session and generate the first message:
```bash theme={null}
await session.start(
agent=Assistant(chat_ctx=chat_ctx),
room=ctx.room)
# Initial prompt from assistant
assistant_msg = await session.generate_reply( instructions="Greet the user and start the phone screening process by asking a single question and waiting for the user's response." )
chat_ctx.add_message(role="assistant", content=assistant_msg)
```
The last line is to make sure we preserve the last assistant message in our chat context.
### The loop!
After the first greeting message from the agent, we want the agent to do the following in a loop:
1. listen for anything the user says and convert it to text (STT)
`user_input = await session.listen()`
2. If the user speaks,
a) Add their message to the running chat context \
`chat_ctx.add_message(role="user", content=user_input)` \
b) Generate an appropriate reply using the integrated LLM \
`feedback_msg = await session.generate_reply(
instructions="Give a brief, specific feedback on the user's response. Then, after a pause ask the next question.")` \
c) Add the agent reply to the context \
`chat_ctx.add_message(role="assistant", content=feedback_msg)` \
d) Speak the agent reply (TTS) \
`await session.speak(feedback_msg)`
And of course, wrap all this in a `try:... except` to catch the exceptions.
## Putting it all together
Optionally, you can implement a user interface to make your application more user friendly. To keep it simple, let's just use `input()` to receive the pdf path and job link. Let's put everything together in our `main.py` file:
```python theme={null}
#if __name__ == "__main__":
# get the resume path and job link as inputs, optionally this could be implemented in a GUI
pdf = str(input("Resume Path: "))
link = str(input("Job Link: "))
# process the contents and extract useful information
job_context = process_link(link)
candidate_context = process_pdf(pdf)
# run your application!
jupyter.run_app(WorkerOptions(entrypoint_fnc=lambda ctx: entrypoint(ctx, candidate_context, job_context)),
jupyter_url="https://jupyter-api-LiveKit.vercel.app/api/join-token"
)
#entrypoint(None, candidate_context, job_context)
```
That's it! Have fun!
 Basically, our agent will have four major components:
* LLM with structured output to understand the resume and job link
* Speech to Text (STT) to convert user speech to digestible text for the interviewer
* Interviewer LLM to conduct the interview based on the user responses and the conversation context so far
* Text to Speech (TTS) to convert the interviewer LLM responses to human-like speech
LiveKit helps us put all these together! We'll explain everything in a bit so buckle up and let's get started!
First, we start by making sure all the packages we need are installed:
```python theme={null}
!pip install LiveKit-agents[openai,silero,deepgram,cartesia,turn-detector]~=1.0
!pip install cerebras-cloud-sdk beautifulsoup4 PyPDF2 pdfplumber
```
Let's import every package we will need. We will explain how each of these packages are used later.
```python theme={null}
from LiveKit.agents import (
Agent,
AgentSession,
JobContext,
RunContext,
WorkerOptions,
cli,
function_tool,
ChatContext,
jupyter
)
# from dotenv import load_dotenv <---- only if you decided to add your environment variables in a separate .env file.
# load_dotenv()
from cerebras.cloud.sdk import Cerebras
import requests, os, json, re, sys
from bs4 import BeautifulSoup
import pdfplumber
from LiveKit.plugins import deepgram, openai, silero
from cerebras.cloud.sdk import Cerebras
from datetime import datetime
```
To make our API calls to Cerebras and LiveKit, we need to add the following API Keys (replace the `XXXXXX`). To get a Cerebras API Key see our [QuickStart guide](https://inference-docs.cerebras.ai/quickstart?utm_source=3pi_livekit-interviewer\&utm_campaign=docs) and to get LiveKit API key and secret see the [Voice AI quickstart](https://docs.LiveKit.io/agents/start/voice-ai/#requirements) .
```python theme={null}
os.environ["LiveKit_API_KEY"] = "
Basically, our agent will have four major components:
* LLM with structured output to understand the resume and job link
* Speech to Text (STT) to convert user speech to digestible text for the interviewer
* Interviewer LLM to conduct the interview based on the user responses and the conversation context so far
* Text to Speech (TTS) to convert the interviewer LLM responses to human-like speech
LiveKit helps us put all these together! We'll explain everything in a bit so buckle up and let's get started!
First, we start by making sure all the packages we need are installed:
```python theme={null}
!pip install LiveKit-agents[openai,silero,deepgram,cartesia,turn-detector]~=1.0
!pip install cerebras-cloud-sdk beautifulsoup4 PyPDF2 pdfplumber
```
Let's import every package we will need. We will explain how each of these packages are used later.
```python theme={null}
from LiveKit.agents import (
Agent,
AgentSession,
JobContext,
RunContext,
WorkerOptions,
cli,
function_tool,
ChatContext,
jupyter
)
# from dotenv import load_dotenv <---- only if you decided to add your environment variables in a separate .env file.
# load_dotenv()
from cerebras.cloud.sdk import Cerebras
import requests, os, json, re, sys
from bs4 import BeautifulSoup
import pdfplumber
from LiveKit.plugins import deepgram, openai, silero
from cerebras.cloud.sdk import Cerebras
from datetime import datetime
```
To make our API calls to Cerebras and LiveKit, we need to add the following API Keys (replace the `XXXXXX`). To get a Cerebras API Key see our [QuickStart guide](https://inference-docs.cerebras.ai/quickstart?utm_source=3pi_livekit-interviewer\&utm_campaign=docs) and to get LiveKit API key and secret see the [Voice AI quickstart](https://docs.LiveKit.io/agents/start/voice-ai/#requirements) .
```python theme={null}
os.environ["LiveKit_API_KEY"] = "