> ## Documentation Index
> Fetch the complete documentation index at: https://inference-docs.cerebras.ai/llms.txt
> Use this file to discover all available pages before exploring further.
# Get Started with FlutterFlow
> Learn how to build fast, cross-platform AI-powered apps using Cerebras Inference with FlutterFlow's visual development platform.
## What is FlutterFlow?
[FlutterFlow](https://flutterflow.io/?utm_source=3pi_flutterflow\&utm_campaign=partner_doc) is a visual development platform that enables you to build high-quality, custom, cross-platform applications without extensive coding. By integrating Cerebras's ultra-fast inference capabilities, you can create beautiful AI-powered apps that:
* **Build for Scale**: Collaborate efficiently to create robust apps that grow with your needs
* **Iterate Fast**: Rapidly test, refine, and deploy your app, accelerating your development cycle
* **Fully Integrate**: Access databases, APIs, and custom widgets all in one place
* **Deploy Cross-Platform**: Launch on iOS, Android, web, and desktop from a single codebase
## Prerequisites
Before you begin, ensure you have:
* **Cerebras API Key** - Get a free API key [here](https://cloud.cerebras.ai/?utm_source=3pi_flutterflow\&utm_campaign=partner_doc). This key provides access to Cerebras's ultra-fast inference models.
* **FlutterFlow Account** - Visit [FlutterFlow](https://flutterflow.io/?utm_source=3pi_flutterflow\&utm_campaign=partner_doc) and create an account or log in to your existing account.
* **Basic FlutterFlow Knowledge** - Familiarity with the FlutterFlow Builder interface and basic app development concepts will be helpful.
## Configure FlutterFlow with Cerebras
First, you'll securely store your Cerebras API key in FlutterFlow as an App State Variable. This ensures your API key is protected and persisted across app sessions.
1. Open your FlutterFlow project in the Builder
2. Navigate to the **App Values** tab in the left sidebar
3. Click **Add Field** to create a new app state variable
4. Configure the variable:
* **Field Name**: `cerebrasApiKey`
* **Type**: `String`
* **Persisted**: Enable this option (so the API key is remembered even when you close the app)
* **Secure Persisted Fields**: Enable this option for additional security
5. Enter your Cerebras API key in the **Default Value** field
Enabling "Secure Persisted Fields" ensures your API key is encrypted and stored securely on the device. For production apps, consider implementing server-side API calls to keep your API key completely secure.
Now you'll create a custom API call that connects to Cerebras's inference endpoint. This call will handle all communication with Cerebras models using the OpenAI-compatible API format.
1. Navigate to the **API Calls** tab in the left sidebar
2. Click **Add API Call** to create a new API call
3. Configure the basic settings:
* **API Call Name**: `CerebrasCompletion`
* **Method Type**: `POST`
* **API URL**: `https://api.cerebras.ai/v1/chat/completions`
Next, add the following variables to make your API call dynamic:
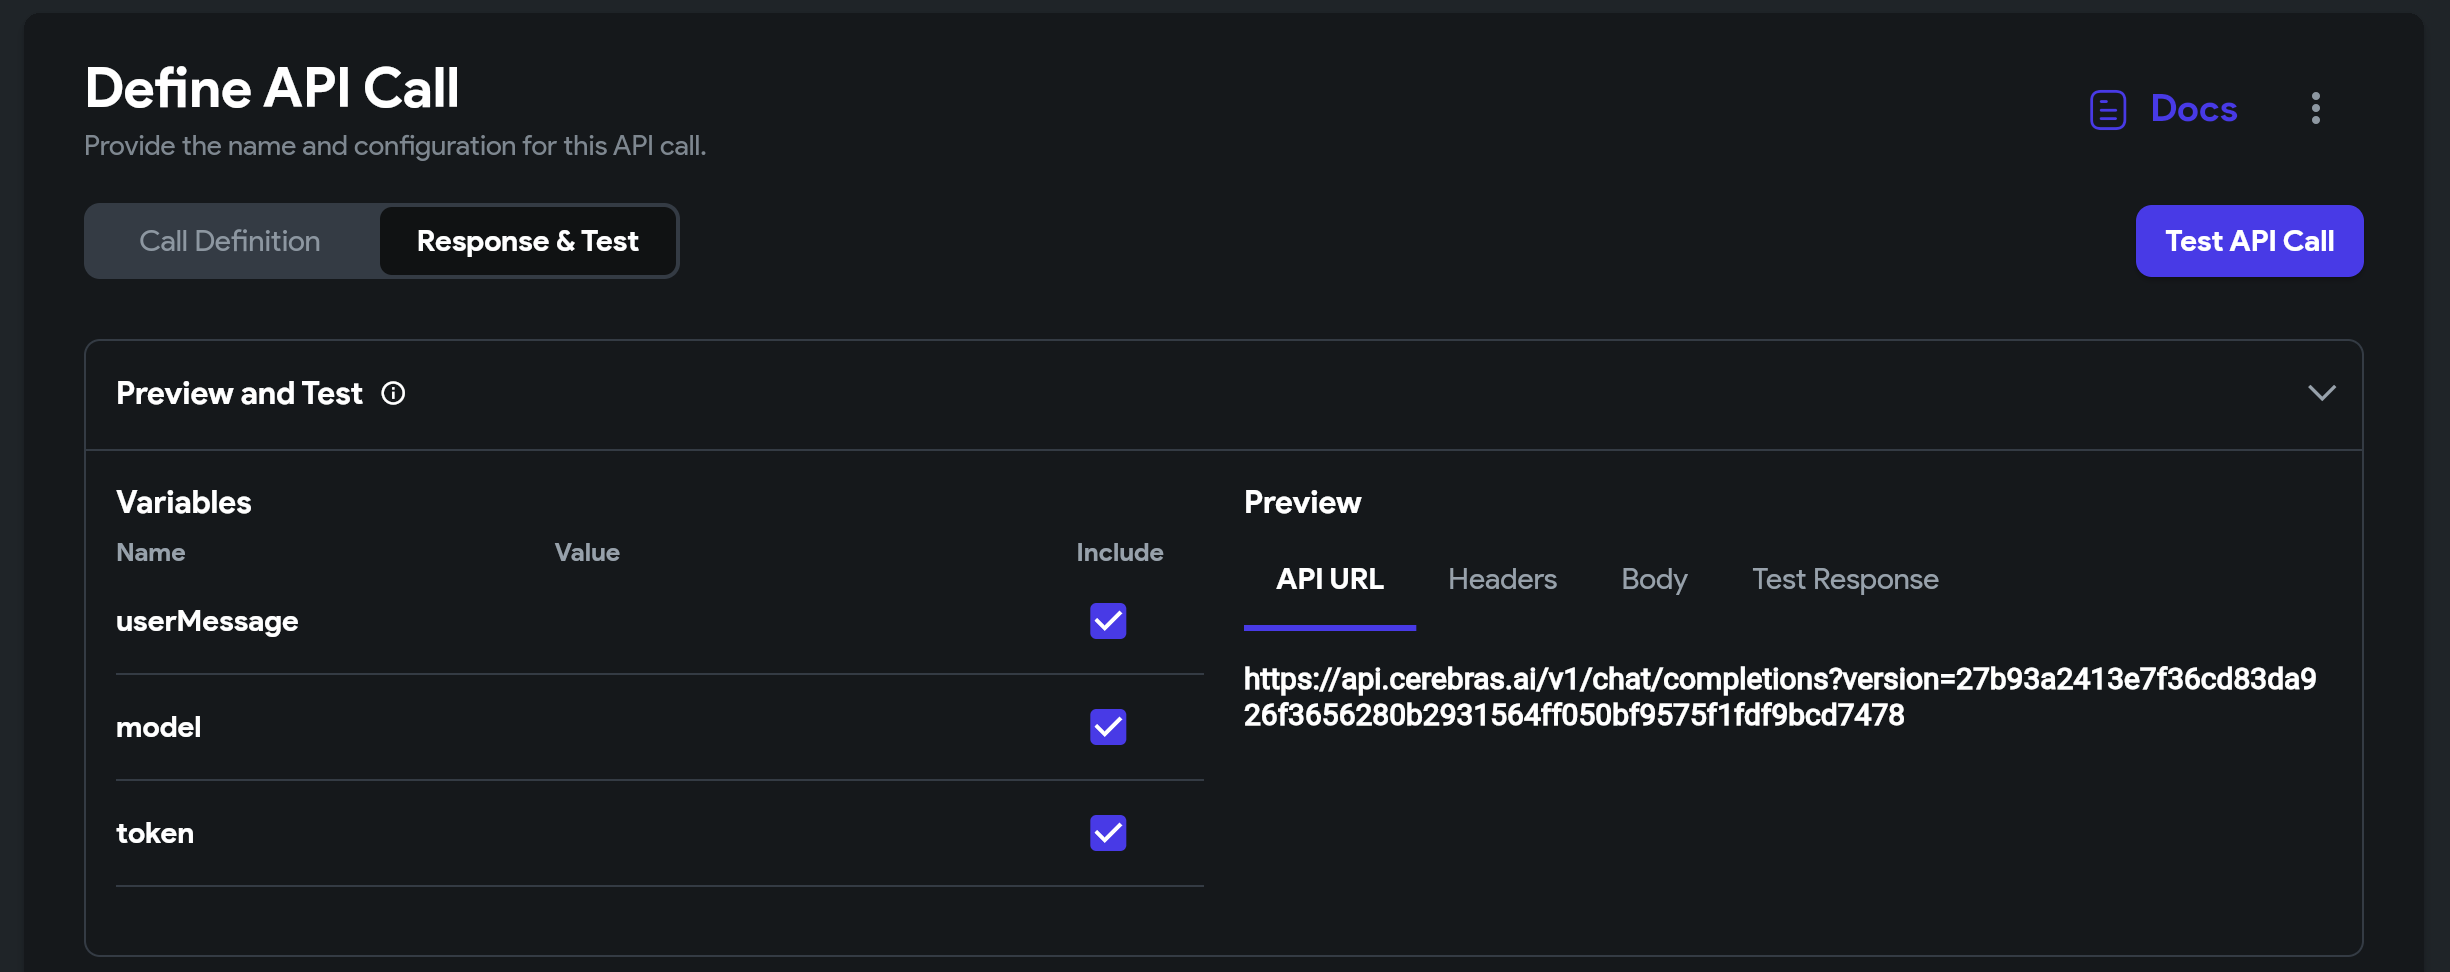
* **token** (String): Your Cerebras API key from App State
* **model** (String): The Cerebras model to use (e.g., `gpt-oss-120b`)
* **userMessage** (String): The text input from your user
* **systemPrompt** (String, Optional): System instructions for the model
These variables allow you to reuse this API call throughout your app with different inputs and models. You can add more variables later for advanced features like temperature control or max tokens.
Headers authenticate your request and enable integration tracking. You'll add two important headers that are required for proper authentication and monitoring.
In the **Headers** section of your API call, add:
1. **Authorization Header**:
* Key: `Authorization`
* Value: `Bearer [token]`
The `[token]` references the variable you defined in the previous step and authenticates your request with Cerebras.
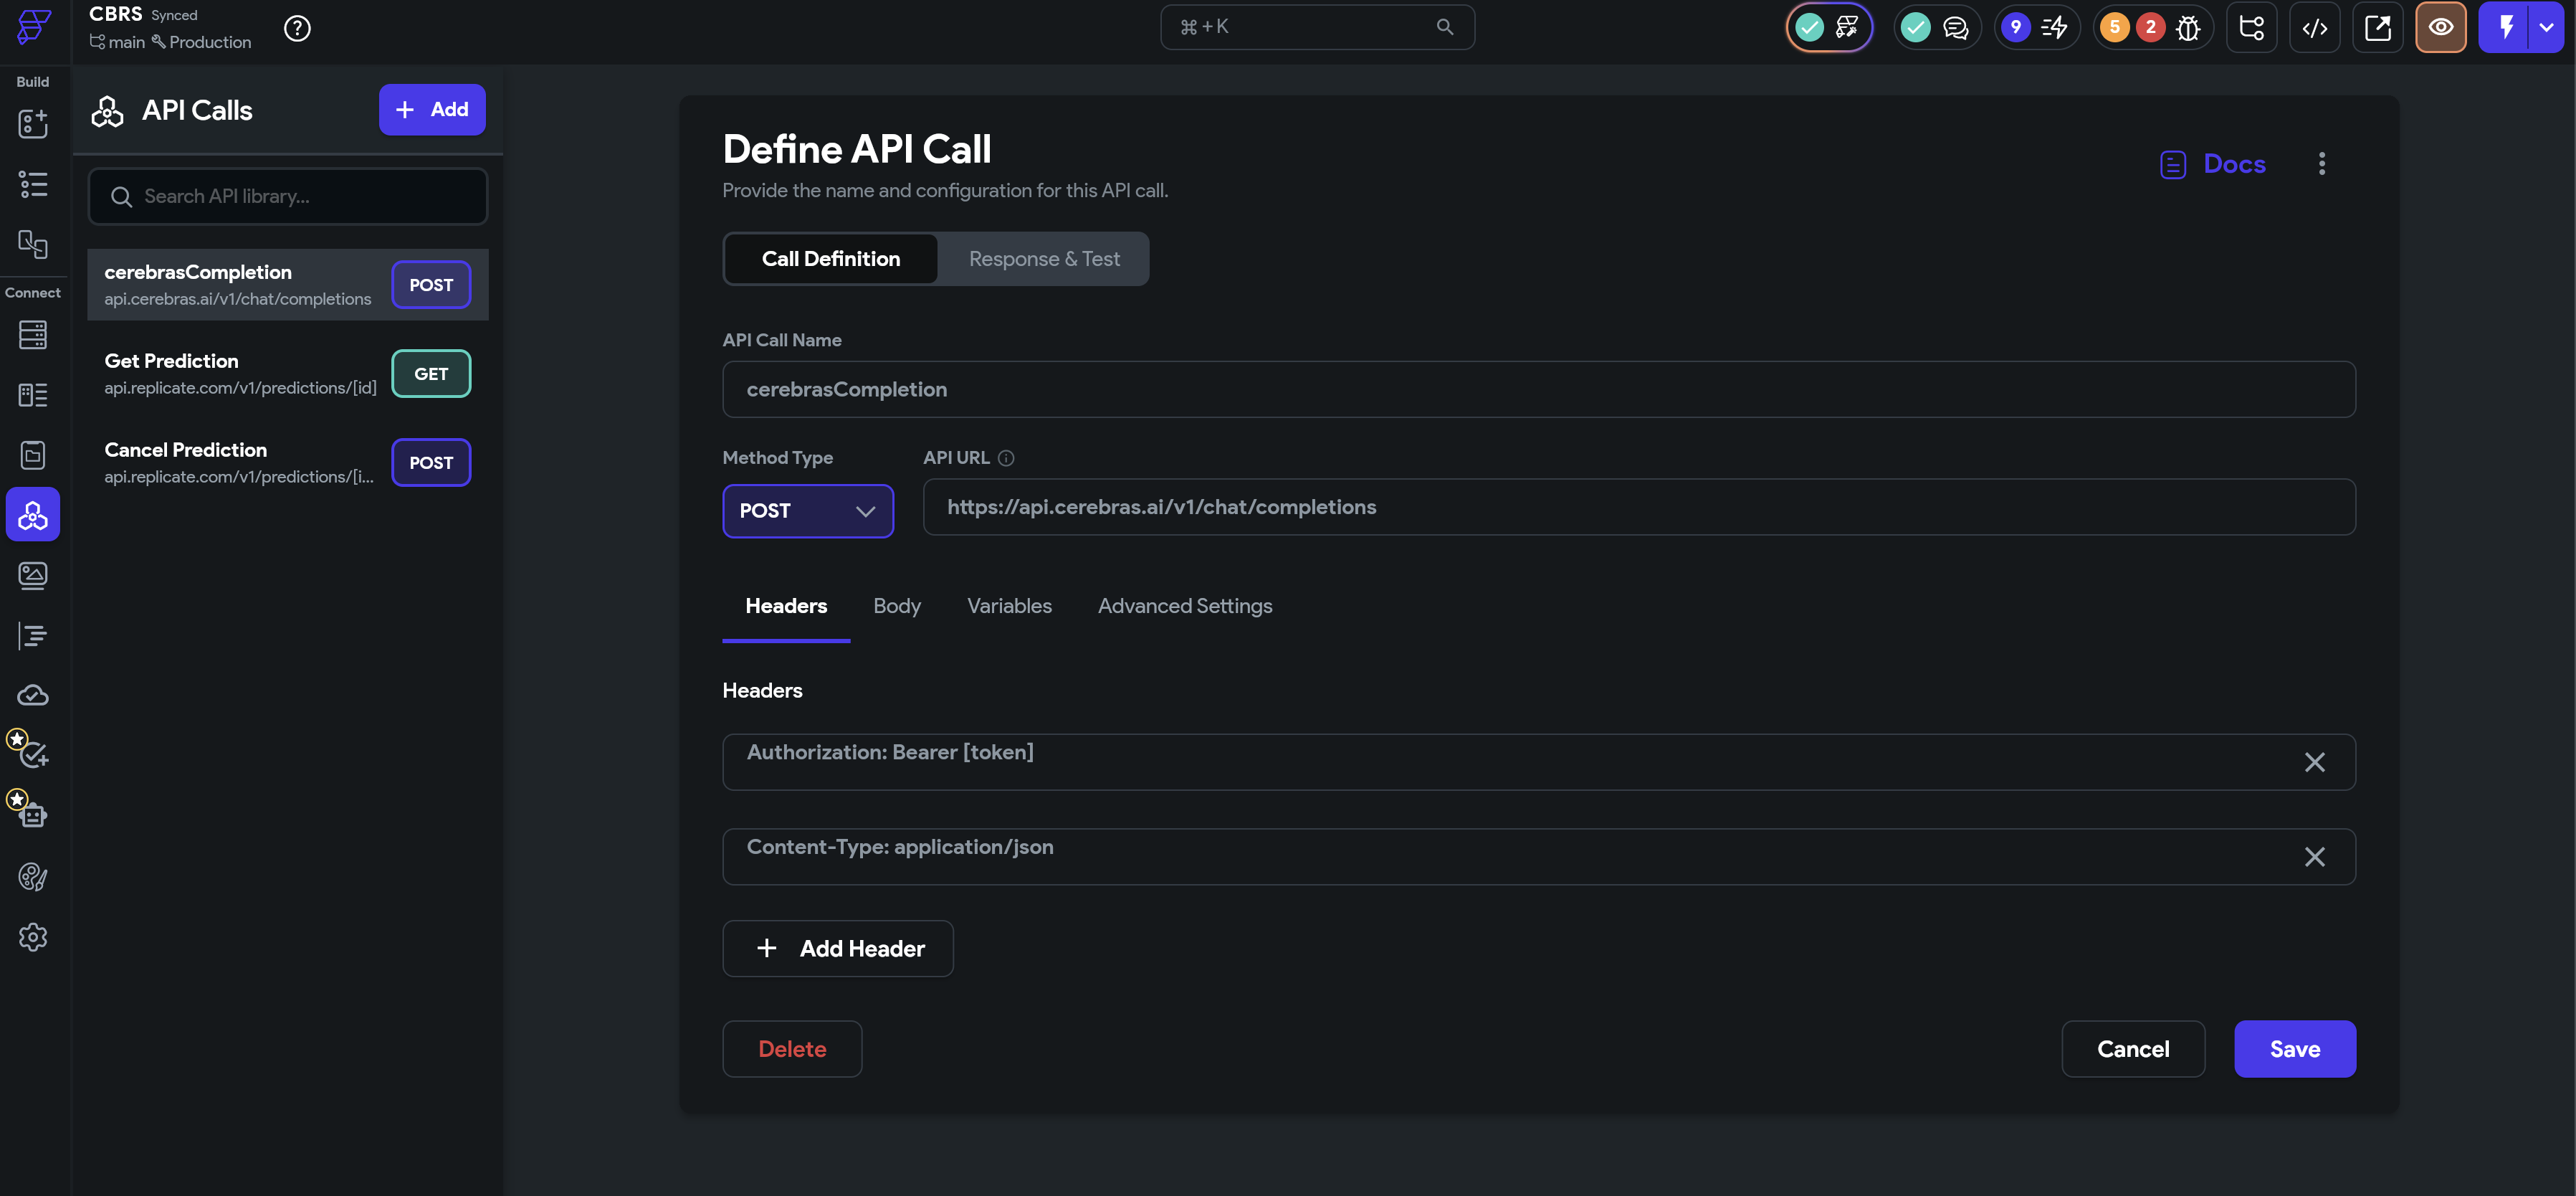 2. **Integration Tracking Header**:
* Key: `X-Cerebras-3rd-Party-Integration`
* Value: `FlutterFlow`
This header helps Cerebras track integration usage and provide better support for FlutterFlow users.
Make sure to include both headers exactly as shown. The Authorization header is required for authentication, and the integration tracking header helps us improve the FlutterFlow experience.
The request body contains the actual data sent to Cerebras. You'll structure it as JSON to match the OpenAI-compatible API format that Cerebras supports.
2. **Integration Tracking Header**:
* Key: `X-Cerebras-3rd-Party-Integration`
* Value: `FlutterFlow`
This header helps Cerebras track integration usage and provide better support for FlutterFlow users.
Make sure to include both headers exactly as shown. The Authorization header is required for authentication, and the integration tracking header helps us improve the FlutterFlow experience.
The request body contains the actual data sent to Cerebras. You'll structure it as JSON to match the OpenAI-compatible API format that Cerebras supports.
 In the **Body** section:
1. Select **JSON** as the body type
2. Add the following JSON structure:
```json theme={null}
{
"model": "[model]",
"messages": [
{
"role": "system",
"content": "[systemPrompt]"
},
{
"role": "user",
"content": "[userMessage]"
}
],
"stream": false
}
```
The variables in square brackets (e.g., `[model]`, `[userMessage]`) will be automatically replaced with the values you pass when calling this API. The `stream` parameter is set to `false` for simpler response handling in FlutterFlow.
You can drag and drop variables from the Variables panel into the JSON body, or type them manually using square brackets. For streaming responses, set `"stream": true` and handle the response accordingly.
FlutterFlow needs to know how to extract the AI's response from Cerebras's API response. You'll define a JSON path that navigates to the specific field containing the generated text.
1. In the **Response & Test** section, click **Add Response**
2. Create a JSON path to extract the message content:
* **Field Name**: `responseText`
* **JSON Path**: `$.choices[0].message.content`
* **Type**: `String`
This tells FlutterFlow to extract the AI's response text from the nested JSON structure returned by Cerebras. The path navigates to the first choice, then to the message object, and finally to the content field.
You can test your API call directly in FlutterFlow by providing sample values for your variables and clicking the **Test API Call** button. This helps verify your configuration before integrating it into your app.
Now you can use your Cerebras API call anywhere in your FlutterFlow app. Here's a common pattern for building a chat interface:
1. Create a page with a text input field for user messages
2. Add a button that triggers the API call
3. Configure the button's action:
* Action: **Backend Call** → **CerebrasCompletion**
* Set variables:
* `token`: Reference your `cerebrasApiKey` from App State
* `model`: `gpt-oss-120b` (or any other Cerebras model)
* `userMessage`: Reference your text input field
* `systemPrompt`: "You are a helpful assistant."
4. Add a text widget to display the response
5. Bind the text widget to the `responseText` field from your API call response
For a better user experience, consider adding a loading indicator while the API call is in progress and error handling for failed requests. You can also store conversation history in App State to build multi-turn conversations.
## Available Cerebras Models
You can use any of these high-performance Cerebras models in your FlutterFlow app. Each model offers different capabilities and performance characteristics:
| Model | Best For | Speed | Capabilities |
| ---------------- | ------------------ | ----- | ---------------------------------------------------------------- |
| **gpt-oss-120b** | Advanced use cases | Fast | Largest model for the most demanding tasks |
| **zai-glm-4.7** | Advanced reasoning | Fast | Advanced 357B parameter model with strong reasoning capabilities |
Simply change the `model` variable in your API call to switch between models. We recommend starting with `gpt-oss-120b` for the best overall experience.
## Testing Your Integration
Use FlutterFlow's built-in test mode to verify your API integration before deploying to devices. This allows you to quickly iterate and debug your implementation.
1. Click the **Test** button in the top-right corner
2. Interact with your app's UI to trigger the Cerebras API call
3. Check the **API Call Logs** in the bottom panel to see request and response details
4. Verify that responses are displayed correctly in your UI
5. Test error scenarios by temporarily using an invalid API key
For the most accurate testing experience, deploy your app to a physical device. This helps you evaluate real-world performance and user experience.
1. Click **Run** → **Test on Device**
2. Follow the instructions to install the app on your iOS or Android device
3. Test the full user experience, including network conditions and performance
4. Verify that API responses are fast and the UI remains responsive
## Frequently Asked Questions
Yes! Cerebras offers free API access with generous rate limits. You can get started immediately by signing up at [cloud.cerebras.ai](https://cloud.cerebras.ai/?utm_source=3pi_flutterflow\&utm_campaign=partner_doc). For production applications with higher volume needs, explore our paid plans.
To implement streaming responses, set `"stream": true` in your request body. You'll need to handle the server-sent events (SSE) format in your response parsing. Consider using custom code or a custom widget to process the streaming data as it arrives. This provides a better user experience for long-form content generation.
Absolutely! You can create multiple API calls with different model configurations, or use a single API call and pass different model names as variables. This allows you to use `gpt-oss-120b` for quick responses and `gpt-oss-120b` for complex reasoning tasks within the same app.
Store conversation history in an App State Variable as a list of message objects. When making API calls, include the entire conversation history in the `messages` array. This allows the model to maintain context across multiple turns. Be mindful of token limits and consider truncating older messages for very long conversations.
Cerebras offers ultra-fast inference speeds thanks to our specialized hardware architecture. You'll experience significantly lower latency compared to traditional GPU-based inference, making your FlutterFlow apps feel more responsive. We also provide OpenAI-compatible APIs, making integration straightforward.
Yes! FlutterFlow apps with Cerebras integration can be deployed to production on iOS, Android, web, and desktop. Ensure your app is ready for launch. Consider implementing server-side API calls to protect your API key in production environments.
## Advanced Configuration
### Adding Temperature and Max Tokens Controls
For more control over model outputs, you can add additional parameters to your API call:
1. Add new variables to your API call:
* **temperature** (Double): Controls randomness (0.0 to 2.0, default 1.0)
* **maxTokens** (Integer): Maximum response length
2. Update your request body:
```json theme={null}
{
"model": "[model]",
"messages": [
{
"role": "system",
"content": "[systemPrompt]"
},
{
"role": "user",
"content": "[userMessage]"
}
],
"temperature": [temperature],
"max_tokens": [maxTokens],
"stream": false
}
```
## Troubleshooting
* Verify your Cerebras API key is correct in the App State Variable
* Ensure the Authorization header is formatted as `Bearer [token]` with a space after "Bearer"
* Check that the `token` variable is properly referenced in the header
* Confirm your API key hasn't been revoked or expired
* Check your internet connection and network settings
* Verify the API URL is correct: `https://api.cerebras.ai/v1/chat/completions`
* Try using a faster model like `gpt-oss-120b` for quicker responses
* Increase the timeout setting in FlutterFlow's API call configuration
* Verify the JSON path for response parsing is correct: `$.choices[0].message.content`
* Check the API Call Logs to see if the response is being received
* Ensure your text widget is properly bound to the `responseText` field
* Test the API call independently using the Test API Call button
* Verify you're using a valid Cerebras model name
* Check the [available models](/models) documentation for the current list
* Ensure there are no typos in the model name
* Confirm the model you're trying to use is available in your region
* Implement exponential backoff for retries (wait 1s, 2s, 4s, etc.)
* Consider caching responses to reduce API calls
* Review your [API usage limits](https://cloud.cerebras.ai/?utm_source=3pi_flutterflow\&utm_campaign=partner_doc) in the Cerebras dashboard
* Upgrade to a paid plan if you need higher rate limits
* Switch to a faster model like `gpt-oss-120b` for simpler tasks
* Optimize your prompts to be more concise
* Check your network connection quality
* Consider implementing response caching for common queries
## Next Steps
Learn more about building apps with FlutterFlow's visual development platform
Understand each Cerebras model's capabilities and choose the right one for your use case
Join the community to share your AI-powered apps and get help from other developers
Guide for migrating to the GLM-4.7 model
### Additional Learning Resources
* **[Cerebras API Reference](/api-reference)** - Complete API documentation with all available parameters
* **[FlutterFlow API Integration Guide](https://docs.flutterflow.io/data-and-backend/api-calls/?utm_source=3pi_flutterflow\&utm_campaign=partner_doc)** - Deep dive into API calls in FlutterFlow
* **[FlutterFlow Templates](https://marketplace.flutterflow.io/?utm_source=3pi_flutterflow\&utm_campaign=partner_doc)** - Browse pre-built templates to accelerate development
We're excited to see what you build with Cerebras and FlutterFlow!
In the **Body** section:
1. Select **JSON** as the body type
2. Add the following JSON structure:
```json theme={null}
{
"model": "[model]",
"messages": [
{
"role": "system",
"content": "[systemPrompt]"
},
{
"role": "user",
"content": "[userMessage]"
}
],
"stream": false
}
```
The variables in square brackets (e.g., `[model]`, `[userMessage]`) will be automatically replaced with the values you pass when calling this API. The `stream` parameter is set to `false` for simpler response handling in FlutterFlow.
You can drag and drop variables from the Variables panel into the JSON body, or type them manually using square brackets. For streaming responses, set `"stream": true` and handle the response accordingly.
FlutterFlow needs to know how to extract the AI's response from Cerebras's API response. You'll define a JSON path that navigates to the specific field containing the generated text.
1. In the **Response & Test** section, click **Add Response**
2. Create a JSON path to extract the message content:
* **Field Name**: `responseText`
* **JSON Path**: `$.choices[0].message.content`
* **Type**: `String`
This tells FlutterFlow to extract the AI's response text from the nested JSON structure returned by Cerebras. The path navigates to the first choice, then to the message object, and finally to the content field.
You can test your API call directly in FlutterFlow by providing sample values for your variables and clicking the **Test API Call** button. This helps verify your configuration before integrating it into your app.
Now you can use your Cerebras API call anywhere in your FlutterFlow app. Here's a common pattern for building a chat interface:
1. Create a page with a text input field for user messages
2. Add a button that triggers the API call
3. Configure the button's action:
* Action: **Backend Call** → **CerebrasCompletion**
* Set variables:
* `token`: Reference your `cerebrasApiKey` from App State
* `model`: `gpt-oss-120b` (or any other Cerebras model)
* `userMessage`: Reference your text input field
* `systemPrompt`: "You are a helpful assistant."
4. Add a text widget to display the response
5. Bind the text widget to the `responseText` field from your API call response
For a better user experience, consider adding a loading indicator while the API call is in progress and error handling for failed requests. You can also store conversation history in App State to build multi-turn conversations.
## Available Cerebras Models
You can use any of these high-performance Cerebras models in your FlutterFlow app. Each model offers different capabilities and performance characteristics:
| Model | Best For | Speed | Capabilities |
| ---------------- | ------------------ | ----- | ---------------------------------------------------------------- |
| **gpt-oss-120b** | Advanced use cases | Fast | Largest model for the most demanding tasks |
| **zai-glm-4.7** | Advanced reasoning | Fast | Advanced 357B parameter model with strong reasoning capabilities |
Simply change the `model` variable in your API call to switch between models. We recommend starting with `gpt-oss-120b` for the best overall experience.
## Testing Your Integration
Use FlutterFlow's built-in test mode to verify your API integration before deploying to devices. This allows you to quickly iterate and debug your implementation.
1. Click the **Test** button in the top-right corner
2. Interact with your app's UI to trigger the Cerebras API call
3. Check the **API Call Logs** in the bottom panel to see request and response details
4. Verify that responses are displayed correctly in your UI
5. Test error scenarios by temporarily using an invalid API key
For the most accurate testing experience, deploy your app to a physical device. This helps you evaluate real-world performance and user experience.
1. Click **Run** → **Test on Device**
2. Follow the instructions to install the app on your iOS or Android device
3. Test the full user experience, including network conditions and performance
4. Verify that API responses are fast and the UI remains responsive
## Frequently Asked Questions
Yes! Cerebras offers free API access with generous rate limits. You can get started immediately by signing up at [cloud.cerebras.ai](https://cloud.cerebras.ai/?utm_source=3pi_flutterflow\&utm_campaign=partner_doc). For production applications with higher volume needs, explore our paid plans.
To implement streaming responses, set `"stream": true` in your request body. You'll need to handle the server-sent events (SSE) format in your response parsing. Consider using custom code or a custom widget to process the streaming data as it arrives. This provides a better user experience for long-form content generation.
Absolutely! You can create multiple API calls with different model configurations, or use a single API call and pass different model names as variables. This allows you to use `gpt-oss-120b` for quick responses and `gpt-oss-120b` for complex reasoning tasks within the same app.
Store conversation history in an App State Variable as a list of message objects. When making API calls, include the entire conversation history in the `messages` array. This allows the model to maintain context across multiple turns. Be mindful of token limits and consider truncating older messages for very long conversations.
Cerebras offers ultra-fast inference speeds thanks to our specialized hardware architecture. You'll experience significantly lower latency compared to traditional GPU-based inference, making your FlutterFlow apps feel more responsive. We also provide OpenAI-compatible APIs, making integration straightforward.
Yes! FlutterFlow apps with Cerebras integration can be deployed to production on iOS, Android, web, and desktop. Ensure your app is ready for launch. Consider implementing server-side API calls to protect your API key in production environments.
## Advanced Configuration
### Adding Temperature and Max Tokens Controls
For more control over model outputs, you can add additional parameters to your API call:
1. Add new variables to your API call:
* **temperature** (Double): Controls randomness (0.0 to 2.0, default 1.0)
* **maxTokens** (Integer): Maximum response length
2. Update your request body:
```json theme={null}
{
"model": "[model]",
"messages": [
{
"role": "system",
"content": "[systemPrompt]"
},
{
"role": "user",
"content": "[userMessage]"
}
],
"temperature": [temperature],
"max_tokens": [maxTokens],
"stream": false
}
```
## Troubleshooting
* Verify your Cerebras API key is correct in the App State Variable
* Ensure the Authorization header is formatted as `Bearer [token]` with a space after "Bearer"
* Check that the `token` variable is properly referenced in the header
* Confirm your API key hasn't been revoked or expired
* Check your internet connection and network settings
* Verify the API URL is correct: `https://api.cerebras.ai/v1/chat/completions`
* Try using a faster model like `gpt-oss-120b` for quicker responses
* Increase the timeout setting in FlutterFlow's API call configuration
* Verify the JSON path for response parsing is correct: `$.choices[0].message.content`
* Check the API Call Logs to see if the response is being received
* Ensure your text widget is properly bound to the `responseText` field
* Test the API call independently using the Test API Call button
* Verify you're using a valid Cerebras model name
* Check the [available models](/models) documentation for the current list
* Ensure there are no typos in the model name
* Confirm the model you're trying to use is available in your region
* Implement exponential backoff for retries (wait 1s, 2s, 4s, etc.)
* Consider caching responses to reduce API calls
* Review your [API usage limits](https://cloud.cerebras.ai/?utm_source=3pi_flutterflow\&utm_campaign=partner_doc) in the Cerebras dashboard
* Upgrade to a paid plan if you need higher rate limits
* Switch to a faster model like `gpt-oss-120b` for simpler tasks
* Optimize your prompts to be more concise
* Check your network connection quality
* Consider implementing response caching for common queries
## Next Steps
Learn more about building apps with FlutterFlow's visual development platform
Understand each Cerebras model's capabilities and choose the right one for your use case
Join the community to share your AI-powered apps and get help from other developers
Guide for migrating to the GLM-4.7 model
### Additional Learning Resources
* **[Cerebras API Reference](/api-reference)** - Complete API documentation with all available parameters
* **[FlutterFlow API Integration Guide](https://docs.flutterflow.io/data-and-backend/api-calls/?utm_source=3pi_flutterflow\&utm_campaign=partner_doc)** - Deep dive into API calls in FlutterFlow
* **[FlutterFlow Templates](https://marketplace.flutterflow.io/?utm_source=3pi_flutterflow\&utm_campaign=partner_doc)** - Browse pre-built templates to accelerate development
We're excited to see what you build with Cerebras and FlutterFlow!