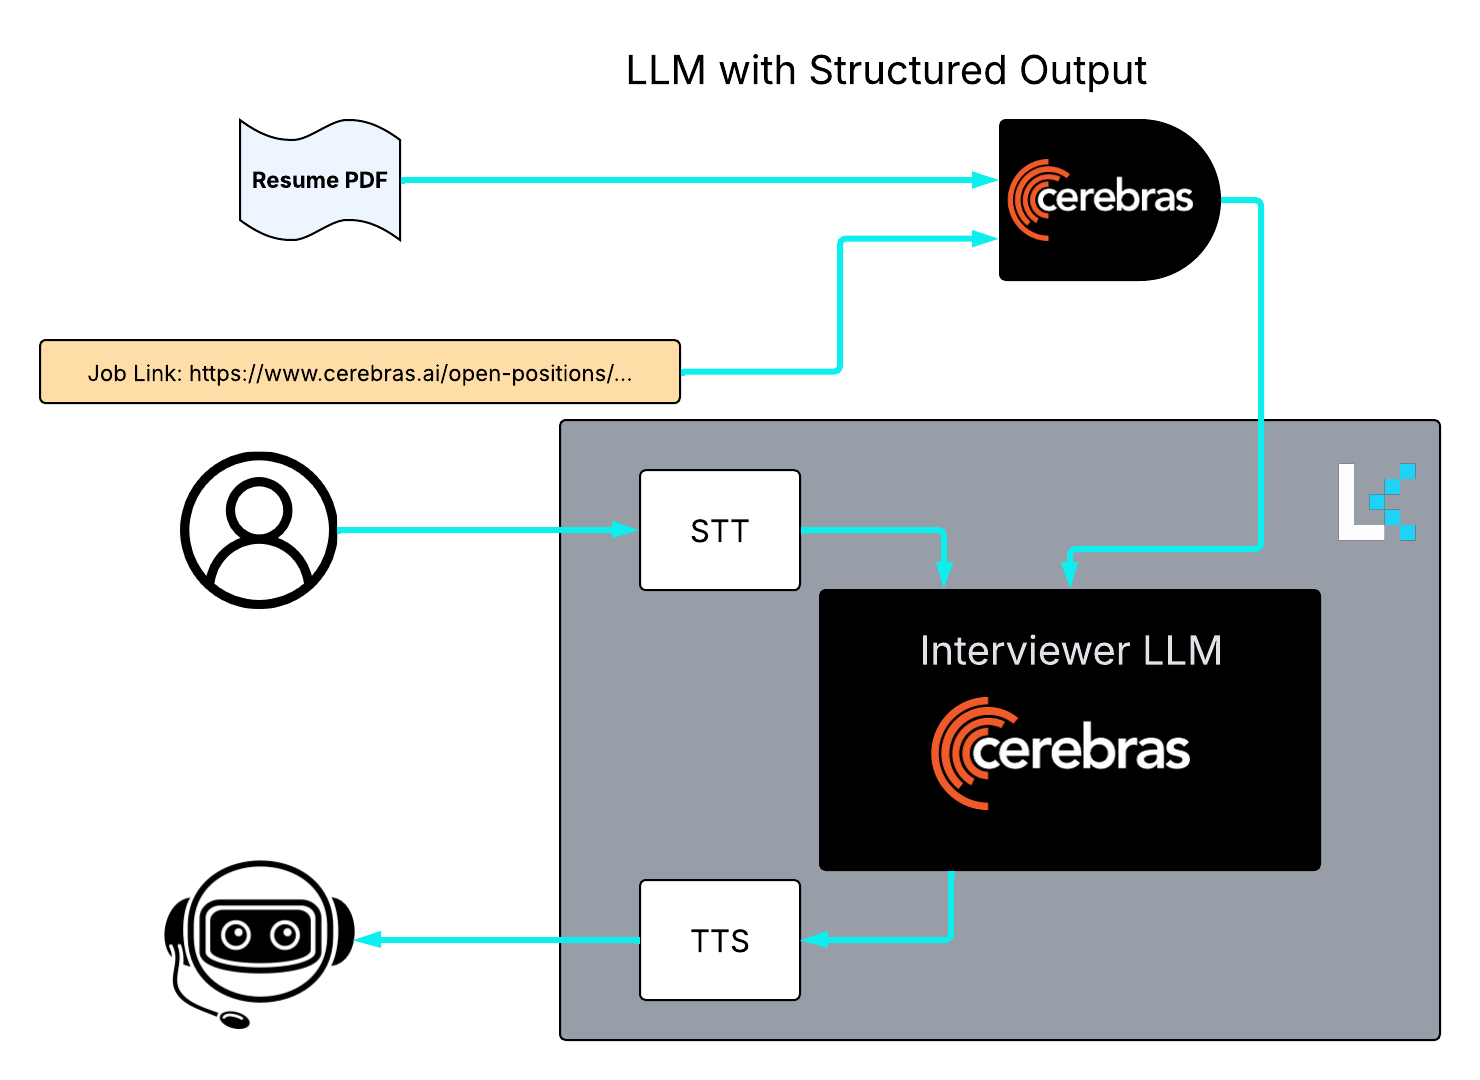
- LLM with structured output to understand the resume and job link
- Speech to Text (STT) to convert user speech to digestible text for the interviewer
- Interviewer LLM to conduct the interview based on the user responses and the conversation context so far
- Text to Speech (TTS) to convert the interviewer LLM responses to human-like speech
XXXXXX). To get a Cerebras API Key see our QuickStart guide and to get LiveKit API key and secret see the Voice AI quickstart .
Parsing the Job description link
Let’s start by extracting useful details from the job link. This information will be added to the context of our interviewer agent. Follow the instructions below. We will need two major components:- A tool to read a given link and extract the text from it. We will use
BeautifulSoupfor this. - An API call to a Cerebras supported LLM to process the input text. We want this LLM to support structured output.
process_link:
Our function looks like this (we will break it down and explain what each segment does):
' '). All this is wrapped inside try:... except:... to catch any exceptions. The resulting text will be used as context for our LLM.
To make the API call to the LLM, we need:
["full-time","part-time","contract","internship"].
process_link function.
Parsing the resume PDF
Now, we do something similar to parse the pdf of the resume file.parse_pdf_to_textwhich converts our pdf file to plain text that will be used as the context to our LLM.process_pdf(which after callingparse_pdf_to_text, makes a Cerebras API call to generate a structured output summarizing the resume content. This function is very similar toprocess_link.
parse_pdf_to_text:
pdfplumber to extract information from a pdf file. Then, we remove the unnecessary characters using Regex.
text. Again, all this is wrapped inside try:... except:... to catch any exceptions.
Interviewer Agent
Even though in this section we are designing a voice agent specifically for an interview practice, the general pipeline can be repurposed to any other voice agent you want to build! Let’s build our interviewer agent:AgentSession. All we need to do is choose what we want to use for Speech To Text (STT), Text To Speech (TTS), and Voice Activity Detector (VAD).
JobContext
When defining our asyncentrypoint function, an important input is the JobContext (here we call it ctx). All you need to do, is to connect to the “room” where the conversation is happening by using:
Assistant
Let’s define our Agent subclass calledAssistant which receives the chat context (subclass of ChatContext) and an instruction (system prompt).
AgentSession
The agent session is responsible for collecting user input, managing the voice pipeline, invoking the LLM, and sending the output back to the user (see LiveKit Docs).ChatContext as input. This is to make sure that we preserve the prior conversations. Before connecting the agent, we might want to give it some prior context. We do that as follows:
job_context (extracted from job link) and candidate_context (extracted from candidate resume),we add the current date as well for the agent’s reference.
Starting the session and generating the first agent message
Now that we have all our ingredients, we can start our session and generate the first message:The loop!
After the first greeting message from the agent, we want the agent to do the following in a loop:-
listen for anything the user says and convert it to text (STT)
user_input = await session.listen() -
If the user speaks,
a) Add their message to the running chat context
chat_ctx.add_message(role="user", content=user_input)
b) Generate an appropriate reply using the integrated LLM
feedback_msg = await session.generate_reply( instructions="Give a brief, specific feedback on the user's response. Then, after a pause ask the next question.")
c) Add the agent reply to the context
chat_ctx.add_message(role="assistant", content=feedback_msg)
d) Speak the agent reply (TTS)
await session.speak(feedback_msg)
try:... except to catch the exceptions.
Putting it all together
Optionally, you can implement a user interface to make your application more user friendly. To keep it simple, let’s just useinput() to receive the pdf path and job link. Let’s put everything together in our main.py file: